A light switch is a common wiring operator in households and any building used for electrical powering of any source. It is somewhat of a control panel button-switch that is affixed to your electrical devices to control their power on and off usage.
The name implies that they are mostly the power source for lights, specifically electrical ones, which are connected to electrical equipment, appliances, or outlets.
You will find some switches that are hand-held, especially for some manual electrical appliances like table fans or pendant and reading lights, and there are many others that are mostly mounted on walls.
Wall-fixed light switches have varied, complementary electrical usages. As it is with some electrical items, your ceiling fan can be wired to your light switch and there are ways to achieve that.
Wiring A Ceiling Fan
There are different methods deployed to wiring your ceiling. It all starts with having and using the appropriate tools that allow you navigate your way during your installation.
The items range from your wires, with a basic knowledge of what different colors are and how to isolate or separate them, to the plier or handy knife for cutting your wires, amongst other things.

Part of your starting points will also include being informed about the codes in your local area as you might be required to obtain permits before doing any electrical work in your house.
As would be expanded on later, every wiring should begin, expectedly, with following or taking precautions and steps for your safety. Something as plausibly dismissive as switching off power, and paying attention to all manual instructions from your product’s manufacturers.
That said, the different approaches to ceiling fan wiring can include any of the following:
i. People power their ceiling fans without connecting it to any switch. The ceiling fan basically draws or feeds off power without source to any switch. As this is not the subject of the article, however, it is important to point out that some ceiling fans have pull chains that alternate the switch control, even as some are directly linked to a remote-control use.
ii. You could connect your fan to a light switch, meaning that both your fan and light draw power source from the same outlet – a single switch. This means that the flip of your switch powers for both the fan are just locked in the same knot, expectedly for the neutral and ground channels, and the connections are somewhat delicate but not difficult. The article examines this in bigger details.
iii. Interestingly, also, you can wire your ceiling fans to a wall switch that is not shared with your light. That is, the switch is not a light switch, as they both have distinctive switches and help you monitor control of each electrical item independently.
However, more often than not, the supply line that powers the two switches are always the same. This is about the intricacies of the whole building wiring that would have possibly gone into consideration at the wiring of the building during its construction.
Getting Familiar With Your Wires
Electrical wires often come in one of these familiar colors: black, red, blue, yellow, white, gray, and green; and they all conventionally have their implied significance.
For instance, many times, the black wire is the supply channel for power from one switch to another or an outlet for all kinds of outlets. They are mostly perceived as primary conduct pipe for wires and therefore deemed dangerous. You are expected to always keep them at safe length and always assume they are live.
The neutral wires are often the white or gray shades, although white wires are the most commonly used and the ones you are most likely to find in your ceiling fan.
So, what are the colors of electrical wires in a ceiling fan? How can you distinguish their uses and how does this impact how you do your wiring ultimately?
Most times, the outlet box contains a red wire, black wire, white wire, and a bare, copper wire, and the ceiling fan most likely has a blue wire, green wire, white wire, and a black wire. It can be an inconsistent array, but it is important to have an idea of what this is all about.
The most immediate of your concerns is to confirm what sort of wires are in the electrical box. When you see the black wire, understand that is the hot or live wire. It leads your wiring connection back to where the light switch is.
The white wire, on the other hand, is predictably the neutral wire and that’s what complements the other wires in the electric circuit.
Then, there is also a red wire in the electrical box with the copper wire. That makes four wire color shades in the electrical box: three wires that often have a protecting coding and a copper wire.
It is these wires that you connect with the ones from the ceiling fan, mostly blue, white, green and black.
What You Need
When you are attempting to wire your ceiling fan, either to a light with different switches or one with a light switch, you would need:
- A drill
- A screwdriver
- A ladder or suspended table (stool)
- A wire stripper or razor blade
- Wire knots (connectors)
- An electrical tape

Wiring A Ceiling To A Light Switch
Earlier, there was a reference to how you might choose to wire your ceiling fan, amongst which could be with a light switch or two switches. The two wall-bound switches are most times to control the fan and light separately.
However, for a shared light switch, ceiling fan can be wired if you have a clear understanding of what to do with the wires in your fan, especially the red wire and blue one. You can take the steps below:
1. Understand Wiring Colors
This is important, entry-level-like knowledge about wiring your ceiling fan to the light switch. You can refer to the earlier content on what these colors are and what each represent or should represent in your wiring.
2. Choose Safety
You might want to turn the power off at the panel board or circuit breaker box so you can avoid any potential accident.
Naturally, the supply channels of light rely on the panel board, also known as the electric panel, for other circuits to feed off. Shutting the circuit down is reducing the risk of electrocution.
In the case of fixed light switch, also ensure that your light fixture’s box is marked for use for any ceiling fan mounting. Checking the light fixture helps you detect that easily.
If for any reason the box is not the right fit for your ceiling fan, you can easily change that by getting a new one and fixing that instead. This should play into the need to prioritize your safety above anything else.
3. Install Mounting Bracket
After ensuring safety precautions have been taken, you have to fix up your fan’s mounting bracket. Every ceiling fan comes with a mounting bracket which is what holds the fan up firmly to the ceiling.
While it is important to strictly follow the instructions from your ceiling fan’s manufacturer in your mounting, ensure that the bracket is well fitted to the ceiling in a way that allows the wires to come through the mid center of the bracket.
More importantly, ensure that the wires are not haranguing around where the mounting bracket screws would be. It is important not to screw through a wire or potentially damage insulation in any of the fan’s wires.
Remember your brackets also help with not just the wiring process but the hanger, so to say, for the ceiling fan’s motor. So, you move to the point where you intelligently and cautiously connect your wires.
4. Connecting Your Wires:
To connect your fan’s wire to the wires in the electrical box, pay attention to the following:
a. Check the electrical box for the white wire in it, there could be more than one though. Do you remember the neutral wire? Yeah, that’s the one.
In your ceiling fan, you will see another white wire, just like it. Ensure to connect the two with each other using your wire knots to clip or join both wire-ends to each other.
Needless to say, the black wire from the ceiling fan is equally its own hot wire and that is the wire that runs the fan’s motor, while also making the blades of the fan turn.
b. Follow the same process for other wires, the black wire from the electrical box to the black wire from the fan, then connect the red wire in the box with the blue wire from your fan, or vice versa, depending on the color combination of your electrical items.
Even so, your green wire from the ceiling fan, you will find that just around the hanging bracket, hard to miss; connect it to the copper wire in your electrical box.
c. Go back to the second step and look at the wire colors closely now. Now, notice that the each wire from the ceiling fan has an accompanying wire with the black wire.
The black wire is like the consistent wire strand. But beside it, there is an accompanying wire aside the neutral wire – the white one. In this case, we assume it is blue. It could be red, too, but most times it is blue.
This blue wire that you are connecting with the red wire from the electrical box is what allows the ceiling fan to run its power with the light switch.
As long as you can locate the wire where the light fixture in the box is and connect it to it, then you are all good with your wiring connection.
In other words, if your accompanying ceiling fan wire is not blue, and it is red, and perhaps there is no red wire in the electrical box, just locate the wire used in the electrical box for its light fixture and connect the blue or red wire from your ceiling fan to it.
v. Always remember that in cases where the wire combinations are not consistent with the above, here now, in the absence of the green wire that you attach to the copper wire, say it is replaced by a yellow for example, although that is noticeable with fan switch with light dimmer, still revert to the connection model highlighted above.
5. Finish Up
You can end where you started again. Ensure that your light switch can absorb the voltage load on it. That is, for both the light and the fan.
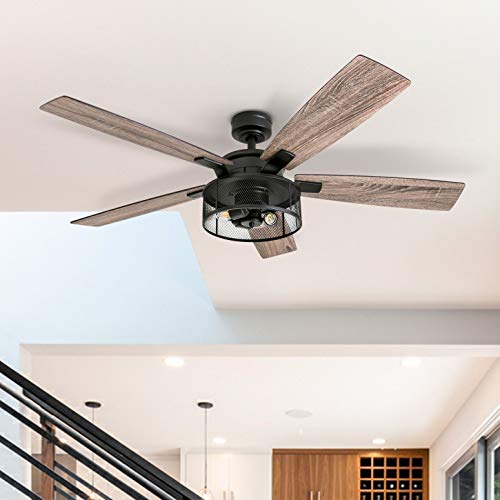
- INDUSTRIAL CEILING FAN: Trend-setting, industrial style. This modern fan flaunts warm rustic, dual-finish rough pine / chestnut blades, a bronze finish motor housing as well as Edison-style light bulbs.
- EDISON BULBS SPECIFICATIONS: Illuminate your space with three E26 / B10 LED bulbs included, clear glass, 25,000 hours lifespan, 2700k, 80 CRI, dimmable 100% to 20%. Lumens (450), Beam Angle (360).
- TRI-MOUNT COMPATIBLE: This fan boasts dynamic hanging abilities. This fan can be mounted with a downrod (standard), angled-mount (sloped) and flush-mount (4” downrod included with purchase).
- QUIET, REVERSIBLE MOTOR: Conveniently quiet, 3 speed - reversible motor. Can be run in the winter to aid in rotating warm air and cutting down on energy costs. Youll love this ceiling fan!
- REMOTE CONTROL INCLUDED: This fans includes 3-speed settings, Smart Sync for quick setup, Walk Away Light Delay and light dimmer. Controlling your ceiling fan has never been easier.
Prices pulled from the Amazon Product Advertising API on:
Product prices and availability are accurate as of the date/time indicated and are subject to change. Any price and availability information displayed on [relevant Amazon Site(s), as applicable] at the time of purchase will apply to the purchase of this product.
Conclusion
Exploring wiring connection of a ceiling fan to a light switch is not about the knowledge of right electrical fitting but also the importance and value of safety.
A quick note on the device used during the set up matters a lot here. As much as the emphasis on safety earlier speaks strongly to the bedrock on which your wiring connection should be predicated on, using tools that ease work and guarantee your safety is very important, too.
For instance, in fixing your mounting bracket on the ceiling, height is an important factor of consideration. Getting a step ladder could make your work safer, cleaner and much better.
Also, when stripping or cutting your wires, especially at the edge, it is better to use a wire stripper as opposed to a razor blade and that’s because of the preference in terms of relative safety that either of the two guarantees you.
Never be inclined to always choose the cheapest, but less safe, substitute, and in moments you are stuck and somewhat challenged to make the best of your connection, get an electrician involved.
Also, it is always helpful to revert to your device manuals and instructions there for preemptive steps that could greatly limit potential injuries or accident.